
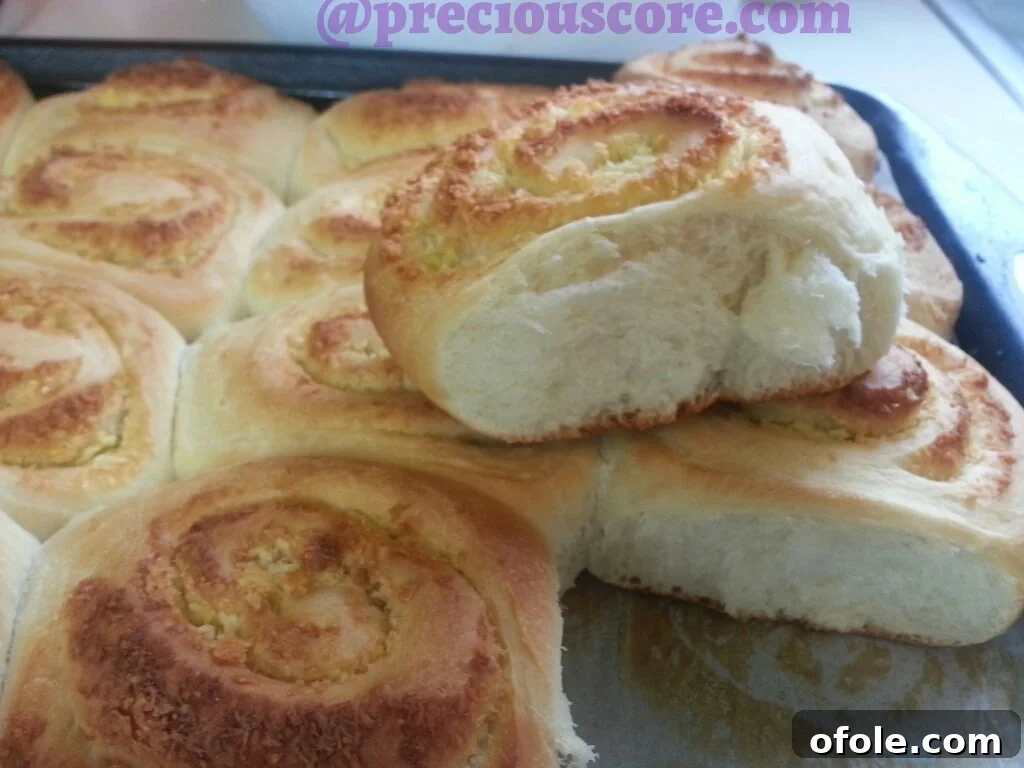
Irresistible Homemade Coconut Rolls: Your Guide to Fluffy, Flavorful Perfection
Mastering the Art of Fluffy Coconut Rolls: Easier Than You Think!
Ingredient Spotlight: The Power of Coconut Infusion
Your “Coconuty” Baking Adventure Begins Now!
Ready to infuse your kitchen with the enchanting aroma of tropical coconut? Let’s dive into this delightful baking project and create some truly memorable Coconut Rolls. Follow these precise steps, and you’ll soon be enjoying warm, fluffy rolls bursting with sweet coconut flavor.
COCONUT ROLLS RECIPE
Prep time: 90 mins (includes dough rising)
Cook time: 20-25 mins
Total time: Approx. 1 hr 50 mins – 2 hours
Yields: Approximately 20 delicious rolls
Ingredients You’ll Need:
For the Dough:
- 3 1/2 cups (about 420g) all-purpose flour, plus extra for dusting
- 5 tablespoons (70g) unsalted butter, softened. (For an enhanced coconut flavor, use a coconut spread or refined coconut oil if available. Otherwise, regular butter works perfectly.)
- 1/2 cup (120ml) full-fat coconut milk (canned or freshly made, see notes)
- 2 1/4 teaspoons (or 1 standard sachet/7g) active dry yeast
- 1/2 cup (120ml) warm water (105-115°F / 40-46°C) for activating yeast
- 3/4 cup (150g) granulated sugar
- 1 large egg, at room temperature
- 1 teaspoon fine sea salt
- Optional: 1/2 teaspoon coconut essence (for an extra fragrant boost)
For the Sweet Coconut Filling:
- 1 cup (approx. 80-100g) coconut powder, finely desiccated coconut, or unsweetened coconut flakes. (If using sweetened flakes, reduce icing sugar.)
- 1/4 cup (approx. 30g) icing sugar (also known as powdered sugar or confectioner’s sugar)
- 2 large eggs, lightly beaten
For Finishing:
- 1 tablespoon (15g) unsalted butter, melted (for brushing the rolls before baking)
- A little water for sealing dough edges
Step-by-Step Instructions:
1. Activate the Yeast:
In a small bowl, combine the warm water (ensure it’s not too hot, as this can kill the yeast, or too cold, which will inhibit activation) with a pinch of the sugar from the dough ingredients. Sprinkle the active dry yeast over the water and stir gently. Let it sit for 5-10 minutes until it becomes foamy and bubbly. This indicates the yeast is active and ready to work its magic, giving your rolls that wonderful fluffy texture. Set aside.
2. Prepare the Coconut Milk:
If using powdered coconut milk, mix it with half a cup of warm water until smooth and free of lumps. If using canned coconut milk, ensure it’s well-mixed (the cream can separate). If you’re using fresh coconut, follow the instructions in the “Notes” section to prepare your rich coconut milk.
3. Melt the Butter/Coconut Spread:
Gently melt your butter or coconut spread over medium-low heat until it’s completely liquid. Alternatively, use a microwave on low power, heating in 15-second intervals, stirring in between, to prevent overheating. Allow it to cool slightly before adding to other ingredients.
4. Combine Wet Ingredients:
In a large mixing bowl, whisk together the activated yeast mixture, the prepared coconut milk, granulated sugar, salt, the lightly beaten egg, and the slightly cooled melted butter/coconut spread. Mix until all ingredients are well combined and the sugar has largely dissolved. This forms the flavorful liquid base for your dough.
5. Begin Adding Flour:
Gradually add about half of the all-purpose flour to the wet ingredients. Using a sturdy spoon or a dough whisk, mix until a thick, shaggy paste begins to form. At this stage, it will be quite sticky, but don’t worry, it’s supposed to be!
6. Form the Dough:
Once the initial flour is incorporated and you have a thick paste (as shown in the image below), set aside your spoon or whisk. Now it’s time to get your hands involved! Add the remaining flour to the bowl. If you’re using coconut essence, now is the perfect time to drizzle it in for an extra aromatic kick. Begin to knead the dough within the bowl, gathering all the flour.
7. Knead the Dough:
Turn the dough out onto a lightly floured surface. Knead for about 8-10 minutes. At first, the dough will be sticky, but as you continue to knead, it will become smooth, elastic, and less sticky. The goal is a supple dough that springs back slightly when gently poked. This kneading process develops the gluten, which is crucial for fluffy rolls. Proper kneading is the secret to achieving that coveted soft, airy texture in your finished coconut buns.
8. First Rise (Proofing):
Lightly grease a clean large bowl with a little oil. Place the kneaded dough into the bowl, turning it once to coat the entire surface with oil. Cover the bowl tightly with plastic wrap to prevent the dough from drying out. Now, find a warm, draft-free place for the dough to rise. A common trick is to warm your oven to its lowest setting for just 2 minutes, then turn it off and place the covered dough inside. Let it rise for about 1 hour, or until it has visibly doubled in size. This first rise develops deep flavors and a wonderfully light texture, essential for truly fluffy coconut bread.
9. Prepare the Coconut Filling:
While your dough is happily rising, prepare the star of our rolls – the delectable coconut filling! In a medium bowl, combine the coconut powder (or desiccated coconut/flakes), the icing sugar, and the lightly beaten eggs. Mix thoroughly until you have a moist, spreadable mixture. If your mixture seems too dry, you can add a tiny bit more egg; if too wet, a touch more coconut. The goal is a consistency that is easy to spread but holds its shape. The beautiful yellow hue from the eggs will make this filling even more appealing, promising a rich flavor within your homemade coconut buns.
10. Check the Dough’s Rise:
After approximately one hour, your “baby dough” should have grown considerably, transforming into a magnificent “adult dough” that has at least doubled in size. It should be plump and airy, a clear sign that your yeast is active and the gluten has developed beautifully.
11. Prepare to Shape the Rolls:
Lightly flour your clean working surface. Gently punch down the risen dough to release the excess air (this is called “degassing”). This step helps create an even texture in your final baked goods. Transfer the dough onto your floured surface.
12. Roll Out the Dough:
First, gently flatten the dough with your hands. Then, using a rolling pin, roll the dough into a large rectangular shape, approximately 1/4 inch (about 0.6 cm) thick. Aim for an even thickness across the entire rectangle for consistent rolls. The larger and more even the rectangle, the more uniform your coconut roll spirals will be.
13. Spread the Filling:
Evenly spread your prepared, delicious coconut filling over the entire surface of the rolled-out dough, leaving a small border (about 1/2 inch) free on one of the longer edges. This border will help seal the roll later, preventing the filling from escaping during baking.
14. Roll Up the Dough:
Starting from the longer edge opposite the border you left free, carefully begin to roll the dough tightly into a log. Roll it as evenly as possible to ensure each slice will have a beautiful spiral of filling, contributing to that irresistible homemade coconut roll appearance.
15. Seal the Roll:
Once you reach the end of the roll with the empty border, lightly brush that edge with a little water. This acts as a glue, helping to seal the dough securely. Finish rolling to seal the log completely. Gently pinch the seam closed along the entire length to prevent it from unrolling during baking.
16. Trim and Cut:
Carefully trim off the uneven ends of the dough log to create neat edges. Then, using a sharp knife or even unflavored dental floss for a super clean cut, slice the log into approximately 20 individual rolls. A good method to ensure even sizing is to first cut the log exactly in half, then cut each half into two, and each quarter into five pieces. This yields uniform rolls. Each roll should be about 1 to 1.5 inches thick. This technique ensures consistency for beautiful fluffy coconut pastries.
17. Second Rise:
Line a large baking tray with parchment paper. Arrange the cut coconut rolls on the prepared tray, leaving about 1-2 inches of space between each roll, as they will expand during the second rise and baking. Cover the tray loosely with plastic wrap or a clean kitchen towel and let them rise in a warm, draft-free place for another 10-15 minutes, or until they look visibly puffy. This final rise ensures super light and airy rolls, contributing to the ultimate fluffy coconut buns.
18. Prepare for Baking:
While the rolls are completing their second rise, preheat your oven to 325°F (160°C). Melt the tablespoon of butter for brushing. If you don’t have a microwave, you can easily melt it in a small heatproof bowl placed over a pot of simmering hot water (a “double boiler” method), stirring until liquid.
19. Brush and Bake:
Once the rolls have puffed up beautifully, gently brush the tops of each roll with the melted butter. This butter wash will give them a gorgeous golden-brown crust and add a touch of richness, enhancing the appeal of your homemade coconut bread. Carefully place the baking tray into your preheated oven.
20. Golden Perfection:
Bake for approximately 20-25 minutes, or until the tops are beautifully golden brown and the rolls are baked through. Baking times can vary slightly depending on your oven, so keep an eye on them. The aroma filling your kitchen will be a delicious indicator that they are almost ready! Once baked, let them cool slightly on the tray before transferring to a wire rack. Serve warm for the best experience.
Chef’s Notes & Pro Tips for Coconut Roll Success
These extra tips will help you perfect your coconut rolls and make the most of your ingredients, ensuring every batch of fluffy coconut pastries is a resounding success:
Using a Whole Coconut:
If you’re embracing the full natural flavor of a whole coconut, here’s how to prepare it:
- Extracting Coconut Milk: Crack open your fresh coconut carefully and remove the white flesh. Grate the coconut flesh thoroughly. For making milk for the dough, blend the grated coconut with just enough warm water (less than you might normally use for drinking milk, aiming for a ratio of about 1 cup grated coconut to 1/2 cup water) to create a very thick, rich coconut milk. Strain the mixture using a cheesecloth or a fine-mesh sieve, squeezing out all the liquid. This concentrated milk will impart a deep, authentic coconut flavor to your dough. You might need to repeat the blending and straining process once or twice to extract maximum flavor and liquid.
- Preparing Coconut for Filling: After extracting the milk, you’ll be left with the fibrous, shredded coconut pulp. To use this for your filling, you need to dry it out. Spread the shredded coconut in a thin layer on a baking sheet. You can either dry it in a preheated oven at its lowest setting (around 150-200°F / 65-95°C) for 30-60 minutes, stirring occasionally, until it’s dry but not browned. Alternatively, you can dry it in a cooking pan over very low heat on the stovetop, stirring constantly to prevent burning, until it’s dry and crumbly. Once dried, use this shredded coconut in your filling mixture as specified in the recipe. This method ensures no part of your fresh coconut goes to waste and gives you an intensely flavorful filling. Easy breezy, indeed!
Yeast Activation Check: Always ensure your yeast is active. If your yeast and warm water mixture doesn’t get foamy after 5-10 minutes, your yeast might be expired or the water temperature was incorrect. It’s best to start with fresh yeast and try again to guarantee light and airy homemade coconut rolls.
Room Temperature Ingredients: Using room temperature eggs and coconut milk helps the ingredients combine more smoothly and allows the yeast to activate more effectively, leading to a more consistent and well-risen dough.
Kneading Time: Don’t skimp on the kneading time. This is what develops the gluten structure, leading to those wonderfully airy and fluffy rolls. If using a stand mixer with a dough hook, knead for about 6-8 minutes on medium-low speed until the dough is smooth and elastic.
Warm Place for Rising: A consistently warm environment is crucial for dough rising. If your oven trick isn’t an option, find the warmest spot in your kitchen, or even place the covered bowl in a slightly warmed microwave (turned off, of course). Avoid cold drafts at all costs.
Preventing Dry Dough: Always cover your dough tightly with plastic wrap during rising to prevent a dry crust from forming, which can inhibit a good rise and affect the final texture of your sweet coconut rolls.
Even Slices: For beautiful, uniform rolls, make sure your dough log is consistent in thickness before slicing. Using a ruler can help if you’re aiming for perfection in your coconut roll recipe.
Storage: These homemade coconut rolls are best enjoyed fresh and warm from the oven. However, they can be stored in an airtight container at room temperature for up to 2-3 days. For longer storage, freeze cooled rolls in a freezer-safe bag for up to a month. Reheat gently in the oven or microwave for a fresh-baked taste.
Variations: Feel free to experiment! You could add a sprinkle of toasted coconut flakes on top before baking for extra crunch, or a simple glaze of powdered sugar and coconut milk after baking for added sweetness and shine. A dash of vanilla extract in the dough can also complement the coconut flavor beautifully, making your easy coconut recipe even more unique. Consider adding a pinch of nutmeg or cardamom for a different aromatic profile.